Monday 22 April 2013

Woodware - White ....

I had so many plans this weekend but as usual here I am on Sunday night wondering why do weekends always fly by!! I am first up this week for the Woodware DT and our theme is white!! I thought this will be easy, but actually it's not. Also this week I had a lot of birthday cards to make so I kind of left this challenge to the last minute. So apologies for a rather quick and simple effort this week.
For me white cards imply either bridal or sympathy. So rather predictably I went for sympathy. 


The other problem I found with white is that it is difficult to photograph and make look good. Basically I used a script stamp on to parchment paper or vellum stamped with Cotton White Staz-On.
Then I stencil embossed the iris and the sympathy onto white linen card. Both are Dreamweaver stencils.  


Not my best effort I have to say. But hopefully the other girls will provide some better inspiration for the rest of the week.
I was asked at short notice to make a couple of large cards for 60th birthday's at work this week. I very rarely make such big cards so that was a little challenging. The female one was to be in lilacs and lavender and have butterflies. So this is what I came up with. 


Since I took the photo I have changed the butterfly on the postcard for a paler one stamped on vellum and cut out which looks better than this dark one. I had to join the two sheets of A4 together with a folded piece of paper at the top but it seems to have worked. The card I made for a male colleague was with a golfing theme but I forgot to take a picture of it before handing it over!!
Hope you all have a good week. 
Siobhan x

Tuesday 16 April 2013

Crafty Cardmakers - Tag/Card with matching gift bag/box of gift wrap

Hello we have something different for you this week…


We are sponsoring the challenge over on the Crafty Card Makers this week, so we thought we should just play along with their choice of topic (gives my brain a rest), so if you blog please use the link on the Crafty Card Maker’s blog to add your card and if you don’t if you e-mail your card to me and I will post it here and add it to the challenge, but check out the rules as we are playing by the Crafty Card Makers rules, good luck and thanks for playing.

I made an origami folded box with matching card and tag for my take on this week's Woodware challenge.


The origami box is one I make quite often as it is quick and very effective. I got the idea from a book of origami I gave my son but I have since found a You Tube clip of Karen Thomas showing you how to fold the pieces. This size uses to sheets of 12 x 12 scrapbook paper cut into 6 inch squares. I like to use two sheets from each design to get this alternating pattern.


I have also made the box using 8 x 8 inch squares and it is a really useful size. 
Here are the links if you want to have a go :
The first video shows you how to make the box top and the second, the box bottom.


I finished off the top by adding a chipboard tile that I built up layers of embossing powder and stamped into it. 
Here is the coordinating card:

 
The stamping was all done with one of Stampendous's Quad cubes. This is the paisley cube. I have had this for years but I believe it is still available. The chipboard cube is made using a deep impression embossing technique. I built up about 3 layers of Aged Bronze Frantage powder. Before heating the final layer I inked the stamp with Versamark. This I find helps release the stamp but it also makes the indented part of the impression sticky, allowing time to brush over some mica powder. In this case I used a smokey blue colour. I think it makes the piece a sort of Patina effect. 
The 3 circles were just stamped with Versamark and embossed with the same powder.
To finish the ensemble I made a quick tag: 

 
I like the idea of making mating gift packaging and card. It makes the recipient feel that you really have made an effort!! This design is quite masculine. I have in the past made a little origami shirt out of a bank note to fit inside the box ... this usually goes down well!!
Siobhan x

Wednesday 10 April 2013

Woodware - Vellum

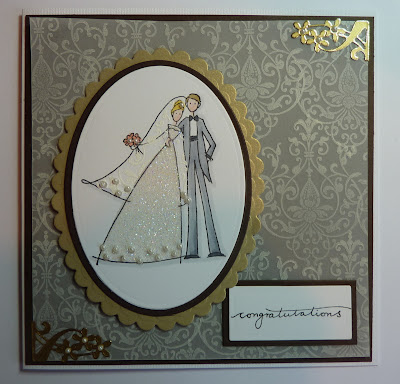
It's time for this week's challenge from Woodware. This week we are using vellum. I remember years ago how difficult it was to buy good patterned vellum. Then along came white Staz-on and then it became easy to stamp your own vellum. So this project kind of reflects the beauty of creating lovely patterned vellum to suit your theme.
I have stamped a square panel of vellum using a lovely scrolled medallion from Stampendous CRV268 and a Cotton White Staz-On ink pad.


The bride and groom is also a Stampendous image, an old one now but is still available and now on cling (V126 Happy Couple). For the brides veil, I stamped the image onto a post-it note and carefully cut out the veil to create a reverse mask. This was placed over the main stamped image and I stamped the medallion on top of the mask using Versamark. Once the mask was removed I covered with detail white embossing powder and embossed with my heat gun.


For the brides dress I stamped onto double sided adhesive film and cut out just the dress. Take off the back contact sheet and stick exactly on top of the main stamped image. After removing the top sheet I stuck down the pearls. The stick better before adding glitter! Then pour over a fine crystal glitter. This technique always gives you a very even layer of glitter, something I find hard to get when using a glue pen and glitter.
Rather than stick the vellum down I have stuck it under the bride and groom topper and used a couple of corners (peel-offs or die cut) the hold down a couple of corners.
So that's it for this week folks. For more ideas using vellum be sure to check out the Woodware blog this week.
Siobhan x

Saturday 6 April 2013

Tagtastic Circle Group - Round Two

Our circle group met today for a cuppa and a catch up in Perth. This month our theme was "Embossed Resist". So here is what our talented bunch came up with:

First up was Erin. She used the resist for the white clock face.The blues work so well to show off the clock face. Her tag went to Lin.
Next is Isobel's tag that was destined for Linda.

 
Isobel used the resist technique for the background. The colours work well and I love her flower!!
Next up is Lin's tag. She made this one for Liz.


I love Lin's subtle and soft colour scheme and the button flower is a lovely finishing touch.
Linda's tag was for Lynne. Unfortunately Lynne couldn't make it today but I know she will love this.

Lynne loves elephants!! Linda has used the resist technique for her jungle trees. It is so effective.
Liz is next up. She was making her tag for Maggie. 

 
The stunning centre piece was embossed with gold powder to really stand out. I love the blues with the gold.
Maggie was to make a tag for me this time.

Like me Maggie uses a lot of nature inspired images in her stamping. The bird is an old Penny Black stamp and is in my personal favourites. The tag is so pretty and I love it.
Pat has made a beautiful oriental themed tag which went to Sue.

The little tags use the resist technique and look great next to the oriental lady. 
My tag this time was made for Erin. I know she likes Alice in Wonderland. 


I really enjoyed making this one as it was a bit of fun.
Sue is another member of our group who loves nature and this is reflected in her lovely tag.

I love the resist image around the edges ..it is so effective. Sue's tag went to Isobel.
As Pat was to get a tag from Lynne who wasn't there, I had made an extra tag as a sample of next month's technique (dry embossing). So this went to Pat.


I love all the different takes on the theme. This post is really for our great little group so they can see each others work. 
Well it turned out to be a lovely day. I even ventured into the garden this afternoon to start tidying up ready for spring!!
Have a good weekend whatever you are doing.
Siobhan x

Thursday 4 April 2013

Woodware - Sketch Challenge 22

We have another sketch challenge this week at Woodware. This is the sketch :


I was at Samuel Taylor's craft shop in Embsay near Skipton a couple of weeks ago and managed to get this beautiful new Stampendous cling stamp called CRR164 "Poem Tree".


I love tree stamps and am always on the look out for new ones. As soon as I saw this in the new catalogue I just had to have it. I have made it fit the sketch as best I can. 

 
I stamped the tree several times in browns and ochre colours to punch out the circles. The brown strip was stamped with gold ink and embossed with a detail gold powder to pick up the very fine script.
I also used the RH edge of the tree to make the foliage border on the background panel. A very simple card but one I thought would be good for masculine occasions. This one will do just fine for my father in law as his birthday is coming up later in the month!!


I think this will be a stamp I will use plenty!! 
Isn't it lovely to have longer evenings again. Although I got caught out on Sunday morning as I totally forgot the clocks were going forward!! 
Remember you can join in our April challenge for a chance to win a voucher. Check out the Woodware blog for details. Have a good week!
Siobhan x
 
Related Posts Plugin for WordPress, Blogger...