I am off to Yorkshire tomorrow with my friend Linda to a craft retreat. We have been a few times now and always have a great time. Janet and Michelle (Lovin'Ink) always make us feel very welcome. A whole weekend of crafting, eating and talking!! Just what I am needing right now!!
I have been asked to do a mini workshop on making your own backgrounds. So I thought it would be nice to show how you can use one stamp to make the background and also use it for your focal image.
Here are my samples ..... I hope they go down OK!
I am now packed and ready to sit down with a glass of wine and looking forward to the weekend.
Hope you all have a good weekend too.
Siobhan x
Thursday, 27 September 2012
Monday, 24 September 2012
Woodware - Resist Techniques
Well that's another weekend gone and all my good intentions flew out the window!! Still I did have a lovely walk up at Faskally woods near Pitlochry on Sunday with my husband and our dogs. It was a lovely day and the trees are starting to turn to their autumn colours.
This week I am first up for the Woodware team and our challenge was to use a resist technique.
I chose to do a wax crayon resist as it's one I don't use often. But it is very simple and quite effective. This works best on glossy card. I stamp the gorgeous Stampendous Agapanthus cluster onto white glossy card with black permanent ink (Memories, Archival or Versafine). Then I coloured in the flowers and along the stems with a white was crayon. Then I used shades of soft yellows and brown dye inks, blended over the top with Cut'n'Dry foam.
I also found the little bee stamp (another old Stampendous stamp) as a little addition. After layering up with gold and bronze card stock, I punched out a few maple leaves and gave them a bit of shape with a large embossing tool. The sentiment is also by Stampendous and I thought it fitted perfectly.
If you haven't tried this technique, give it a go. It works really well and is so easy. Remember to check out the Woodware blog all this week to see what other types of resist get show cased.
This week I am first up for the Woodware team and our challenge was to use a resist technique.
I chose to do a wax crayon resist as it's one I don't use often. But it is very simple and quite effective. This works best on glossy card. I stamp the gorgeous Stampendous Agapanthus cluster onto white glossy card with black permanent ink (Memories, Archival or Versafine). Then I coloured in the flowers and along the stems with a white was crayon. Then I used shades of soft yellows and brown dye inks, blended over the top with Cut'n'Dry foam.
If you haven't tried this technique, give it a go. It works really well and is so easy. Remember to check out the Woodware blog all this week to see what other types of resist get show cased.
Tuesday, 18 September 2012
Woodware - Orange and Brown Colour Combination
This week at Woodware we have gone all Autumnal. Which I guess it is appropriate as we are fast approaching that time of year of battling home from work in the wind and driving rain, darker evenings and cold mornings!!
My offering this week uses a new Woodware stamp designed by Jane Gill called Ferns JG5274. It is one of these foliage stamps which are so versatile. I can see myself using this one regularly.
The single fern is very delicate and great for backgrounds.
I used a selection of orange and brown tones in my Tombow brush markers to colour directly onto the stamp. Then lightly spritz with water to help blend the colours.
I made a decorative border with my favourite crafty edger punch and added a bird.
The bird is from a Magenta laser cut chipboard sheet that has several birds on it. To colour the bird I used brown and orange Cat's Eyes ink pads. These make it easy for detailed colouring on small items such as this. Because it is pigment ink I then cover with clear embossing powder and melt. I usually use 3 layers of powder (using Versamark in between each subsequent layer of powder). This gives a lovely enamelled look. A little black pearl gives your bird a beady eye.
Well that's it for now. I am trying to get ahead of the game as I have a couple of trips coming up and want to be all organised for once!! I can but try!!
Siobhan x
My offering this week uses a new Woodware stamp designed by Jane Gill called Ferns JG5274. It is one of these foliage stamps which are so versatile. I can see myself using this one regularly.

The single fern is very delicate and great for backgrounds.
I used a selection of orange and brown tones in my Tombow brush markers to colour directly onto the stamp. Then lightly spritz with water to help blend the colours.
I made a decorative border with my favourite crafty edger punch and added a bird.
The bird is from a Magenta laser cut chipboard sheet that has several birds on it. To colour the bird I used brown and orange Cat's Eyes ink pads. These make it easy for detailed colouring on small items such as this. Because it is pigment ink I then cover with clear embossing powder and melt. I usually use 3 layers of powder (using Versamark in between each subsequent layer of powder). This gives a lovely enamelled look. A little black pearl gives your bird a beady eye.
Well that's it for now. I am trying to get ahead of the game as I have a couple of trips coming up and want to be all organised for once!! I can but try!!
Siobhan x
Tuesday, 11 September 2012
Anything But a Stamp
This week's challenge at Woodware is to make something without using any stamps. Not something I do very often!! Last week I used a stencil so I had a rake through some peel-offs (yes....I actually have a drawer full) .
I found a sheet of Stampendous peel offs featuring little trees and thought they were quite sweet and would make a simple and quick card.
Rather than stick a tree straight on a piece of card I made a little landscape using embossing powders. I cut a circle of card, inked it thoroughly with Versamark. Starting with the lightest colour, cover a strip near the bottom, tip off the excess. Then with the next colour pour on another area and tip over the first powder. This prevents any contamination. Once all your colours are on heat to melt.
I used Stampendous powders Aged Ivory, Golden Sand and Caramel.
I added some matting layers using Kraft and copper card stock.
I even used the sentiment peel-off from the sheet and a few little birds. A quick and simple card!!
I am away to watch The Great British Bake Off. Still on a high after Andy Murray won the US open last night .... a fantastic end to a great summer of sport. Maybe I will get more crafting done now it's all finished!!
Siobhan x
I found a sheet of Stampendous peel offs featuring little trees and thought they were quite sweet and would make a simple and quick card.
Rather than stick a tree straight on a piece of card I made a little landscape using embossing powders. I cut a circle of card, inked it thoroughly with Versamark. Starting with the lightest colour, cover a strip near the bottom, tip off the excess. Then with the next colour pour on another area and tip over the first powder. This prevents any contamination. Once all your colours are on heat to melt.
I used Stampendous powders Aged Ivory, Golden Sand and Caramel.
I added some matting layers using Kraft and copper card stock.
I even used the sentiment peel-off from the sheet and a few little birds. A quick and simple card!!
I am away to watch The Great British Bake Off. Still on a high after Andy Murray won the US open last night .... a fantastic end to a great summer of sport. Maybe I will get more crafting done now it's all finished!!
Siobhan x
Friday, 7 September 2012
The Stamp Man - Summer Sizzlers
Our new challenge over at The Stamp Man was chosen by Kim. She apparently loves hot summer colours. As we appear to be having a nice spell before autumn arrives I was a bit confused and ended up using my lovely Stampendous Raven stamp. So apologies for my misinterpretation!! Just see the hot colours and not the raven!!
Both the background panels were made using blended Distress inks - Mustard Seed, Spiced Marmalade, Worn Lipstick, Barn Door and Picked Raspberry. I added some layers of stamping for texture. The gorgeous border stamp is another Stampendous stamp that I use a lot. It comes from a Jumbo Cling set called "Hollyhocks".
I have a thing about Ravens and find them fascinating. As soon as I saw this stamp I had to have it!! The little punched circles came from the Stampendous Crowscape stamp that I bought last year, which is still available.
To finish the card I made a flower punched from Glassine paper. I used the largest flower from Tim's Tattered Floral die and cut several layers. I stamped them with a texture stamp using metallic gold Staz-on. Before joining the layers with a brad I crumpled them up. I love the effect you get with this glassine paper.
Remember if you want to join us, the theme is Summer Sizzlers... anything you like using hot summer colours. There is a £10 voucher for the winner!! Pop along to the challenge blog to see what my team mates have been making for your inspiration.
I have a thing about Ravens and find them fascinating. As soon as I saw this stamp I had to have it!! The little punched circles came from the Stampendous Crowscape stamp that I bought last year, which is still available.
To finish the card I made a flower punched from Glassine paper. I used the largest flower from Tim's Tattered Floral die and cut several layers. I stamped them with a texture stamp using metallic gold Staz-on. Before joining the layers with a brad I crumpled them up. I love the effect you get with this glassine paper.
Remember if you want to join us, the theme is Summer Sizzlers... anything you like using hot summer colours. There is a £10 voucher for the winner!! Pop along to the challenge blog to see what my team mates have been making for your inspiration.
Thursday, 6 September 2012
Woodware - Sketch 15
It's time for another sketch this week from Woodware. This one is very simple and I have stuck pretty much to the original design.
I met up with Dorothy last weekend at a trade show in Perth. It was nice to catch up and to see all the lovely new products on the Woodware stand. I saw a lovely sample made with a new Dreamweaver stencil and that inspired me to use it for my sample this week.
This is the stencil : LG745 Tree Line
![]() | ||
I ran the stencil through my Cuttlebug with black card to emboss it. Then I sponged Versamark ink through the stencil. To create the moon I punched a circle (I used the Woodware yellow circle punch) from a post-it note. I positioned the circle where I wanted my moon to be and used a brush to brush on pearl mica powder. I used Pearl-ex but there are lots of makes of these shimmery powders.
I removed the circle mask then brushed on 2 or 3 shades of gold powder with the darker one at the bottom.
Then I removed the stencil (which was attached with low tack masking tape) and used a large soft brush to remove any excess powder. A quick spritz of water sets the powder.
To finish off I added a bit of Stampendous Aged Gold and Aged Taupe the image and gold matting layer.
I stamped a few sprigs in black onto the bronze background, added a greeting and then punched out 3 maple leaves from copper metal sheet.
I love the shimmery effect of the mica powders, but as is often the case the photo does not pick up the shimmer too well!!
This is a challenge sketch, so why not show us what you can do and perhaps win a voucher. Check us out on the Woodware blog for details on how to enter.
Looking forward to the weekend and some rest and relaxation!!
Siobhan x
Friday, 31 August 2012
Woodware - Sending a Smile
This week at Woodware we are sending a smile!! For my effort this week I have used a combination of old and new in a very simple card.
The old is the sentiment and flower. Both Stampendous stamps. H248 "Everyone Smiles" is a wood mounted stamp that is still available and the swirly flower is a cling called Ruffled flower. I embossed the flower with white powder on white card stock and used a DTP (direct to paper) technique with 3 shades of blue to colour the flower. Once cut out I added some crystal glitter to the ruffled edges and some pearls for the centre.
For the new I used the lovely fern from a new Woodware set designed by Jane (JGS274 Ferns). This I stamped onto some text paper (from my trusty French dictionary!!).
Then I used my new crafty edger "Garland".
A bit of ribbon and a few pearls finish off this quick and easy card.
Have a good weekend whatever you are doing.
Siobhan
For the new I used the lovely fern from a new Woodware set designed by Jane (JGS274 Ferns). This I stamped onto some text paper (from my trusty French dictionary!!).
Then I used my new crafty edger "Garland".
A bit of ribbon and a few pearls finish off this quick and easy card.
Have a good weekend whatever you are doing.
Siobhan
Saturday, 25 August 2012
Alter It at The Stamp Man
There is a new challenge over at The Stamp Man. I have literally just finished my project and my fingers are still covered with ink. My daughter Catriona has just moved back home for a while as she has just got a new job in Perth. So while I have been covered in paint last weekend, it was for the walls and not a craft project. And for what seemed like ages I couldn't get anywhere near my craft desk as my craft room was filled with boxes!!
However normality is slowly returning and I have had a pleasant afternoon crafting.
Now I have never done anything even remotely Halloween before, and I had not intended too but somehow this is what I made.
It started life as an Ikea mirror. I made a patchwork of stamped pieces to cover it. The sides of the mirror were painted and stamped with a texture stamp.
All the pieces were white card stock and I blended Distress inks, using a palette of oranges, reds, browns and purples.
To each piece I added a few details like gold embossing or embellishments.
The stamps were all Stampendous and Tim Holtz Stamper Anonymous. I absolutely love this raven. He is new from Stampendous. The Stamp Man stock lots of lovely Stampendous stamps at really good prices.
This wrought iron gate is also from Stampendous.
And this lovely little owl came from a hair slide from Primark!!
If you want to join us and have a chance of winning a £10 voucher then all you have to do is alter something. It could be a frame, a box, a note book, a bottle or anything you like. There are some gorgeous samples made by my team mates to inspire you.
Siobhan x
However normality is slowly returning and I have had a pleasant afternoon crafting.
Now I have never done anything even remotely Halloween before, and I had not intended too but somehow this is what I made.
It started life as an Ikea mirror. I made a patchwork of stamped pieces to cover it. The sides of the mirror were painted and stamped with a texture stamp.
All the pieces were white card stock and I blended Distress inks, using a palette of oranges, reds, browns and purples.
To each piece I added a few details like gold embossing or embellishments.
The stamps were all Stampendous and Tim Holtz Stamper Anonymous. I absolutely love this raven. He is new from Stampendous. The Stamp Man stock lots of lovely Stampendous stamps at really good prices.
This wrought iron gate is also from Stampendous.
And this lovely little owl came from a hair slide from Primark!!
If you want to join us and have a chance of winning a £10 voucher then all you have to do is alter something. It could be a frame, a box, a note book, a bottle or anything you like. There are some gorgeous samples made by my team mates to inspire you.
Siobhan x
Dreamweaver Blog Hop
All of this week, the Dream Team and the Woodware UK teams are celebrating the release of the new holiday designs from Dreamweaver Stencils.
Of course, no celebration is complete without prizes...and there are
some fabulous ones for those commenting on both sides of the "pond".
Each team will be providing the opportunity to win four prize packages of stencil designs, perfect for the holidays. Just leave your comments each day on each players' post as well as the Dream It Up! and Woodware UK blogs, and the Dreamweaver and Woodware Facebook pages. Two random commentors will be chosen from the batch of weekday posts, one each from the DW and WW Facebook pages, and from the big hop on Saturday...from each side of the pond!* That's a total of eight prize packages up for grabs! Here's what you could win:
I chose this lovely new Dreamweaver design LJ921 Heart Ornaments. I just loved this simple design as soon as I saw it. I decided to go vintage for my first card.
I blended 3 or 4 colours of dye inks on some white card stock. I lightly stamped the music background in brown ink (Stampendous music score). A few splatters of water adds to the vintage look. Then I stencil embossed the design and added colour with pigment inks and a stencil brush through the stencil.
I stamped through the stencil with a flourish border (from Stampendous clear set Elegant Borders ). I added some Stampendous Frantage Aged Gold to the edges before mounting onto the background.
The background paper was very simply stamped with a new Stampendous pine boughs and embossed with gold powder.
To finish off I used one of Woodwares new crafty edgers and some green and gold organza ribbon. And of course a pearl or too!!
I haven't had much time this week to go blog hopping so I am looking forward to sitting with a cuppa this afternoon and catching up with all the girls both sides of the Atlantic to see what they have created with their stencils.
Don't forget to leave me some holiday cheer as you move on to the other players for today:
Remember to follow along with the challenges on the Dream It Up! and Woodware UK blogs for more prize opportunities, and more crafty inspiration, as well as "liking" DW and WW on Facebook.
*Winners selected must be from USA/Canada/UK only.
Monday, 13 August 2012
Woodware - Paper Piecing
After a rake through my Woodware stamps I came across this useful set designed by Francoise. It is a clear set FRCL 132 Looking Good. Being clear stamps, positioning on patterned papers is easy. Francoise is really good at this technique so I knew I better make a decent effort at cutting out all the pieces.
The papers came from a GCD 8x8 pad called Planes and Trains. I like plaids for men's cards, and this one worked a treat.
To finish off I added a few buttons from Woodware's coffee and cream mixed bag. These bags of buttons are great value for money. I keep all mine in little spice jars from Ikea on top of my ink pad wall unit and they look great!! Sad I know!!
Be sure to stop by Woodware this week to see what the others make. There are sure to be some great samples as most of them are more into this technique than I am.
Friday, 10 August 2012
The Stamp Man - Precious Medals/Metals - Olympics - Gold, Silver of Bronze
Time for another new challenge over at The Stamp Man. Angela is hosting this challenge and she wants us to make something inspired by the Olympics. Team GB have done a fantastic job representing our country and winning so many medals. My only regret is that I haven't been able to watch more of it. Although I did see Andy Murray win his gold medal!!
So my project is a loose interpretation of the theme. I had a chipboard circle and ring (Wendy Vecchi Art Parts) as my starting point. I thought the ring would represent one of the Olympic rings.
I covered the ring with aluminium tape (from B&Q), then used metal tools to add rivets etc. I used alcohol inks to colour the silver tape. Once dry I wiped over a black StazOn pad then sanded with some fine grit paper. During the opening ceremony the forged rings came out of the fire and then all fused together. So my faux metal ring came from that idea. I wanted it to look like a porthole looking out to a world of possibility ...I know, I do get a bit carried away at times!!
The background was made using blended distress inks and a few flicks of water, then over stamped with various Tim Holtz stamps.
Then to finish off I wanted my umbrella man looking out about to step out into a brighter world ....right that's enough of the poetic licence!!
To fit the gold theme I build up about 4 layers of gold embossing powder then sunk in a beautiful flourish stamp (this on is my favourite and is from Hero Arts). I had inked the stamp with Versamark before making the impression. This allowed me to dust over a little bronze mica powder to highlight the flourish. You don't really see that in the photo unfortunately.
Why not join us on the Stamp Man challenge blog and enter a project. You never know, it could be you winning a place in the top 5.
Thank goodness it's Friday, another very busy week and I am so looking forward to a quiet weekend!! Hope you all have a good one too!
Siobhan x
So my project is a loose interpretation of the theme. I had a chipboard circle and ring (Wendy Vecchi Art Parts) as my starting point. I thought the ring would represent one of the Olympic rings.
I covered the ring with aluminium tape (from B&Q), then used metal tools to add rivets etc. I used alcohol inks to colour the silver tape. Once dry I wiped over a black StazOn pad then sanded with some fine grit paper. During the opening ceremony the forged rings came out of the fire and then all fused together. So my faux metal ring came from that idea. I wanted it to look like a porthole looking out to a world of possibility ...I know, I do get a bit carried away at times!!
The background was made using blended distress inks and a few flicks of water, then over stamped with various Tim Holtz stamps.
Then to finish off I wanted my umbrella man looking out about to step out into a brighter world ....right that's enough of the poetic licence!!
To fit the gold theme I build up about 4 layers of gold embossing powder then sunk in a beautiful flourish stamp (this on is my favourite and is from Hero Arts). I had inked the stamp with Versamark before making the impression. This allowed me to dust over a little bronze mica powder to highlight the flourish. You don't really see that in the photo unfortunately.
Why not join us on the Stamp Man challenge blog and enter a project. You never know, it could be you winning a place in the top 5.
Thank goodness it's Friday, another very busy week and I am so looking forward to a quiet weekend!! Hope you all have a good one too!
Siobhan x
Tuesday, 7 August 2012
Woodware - Black and White with a Pop of Blue
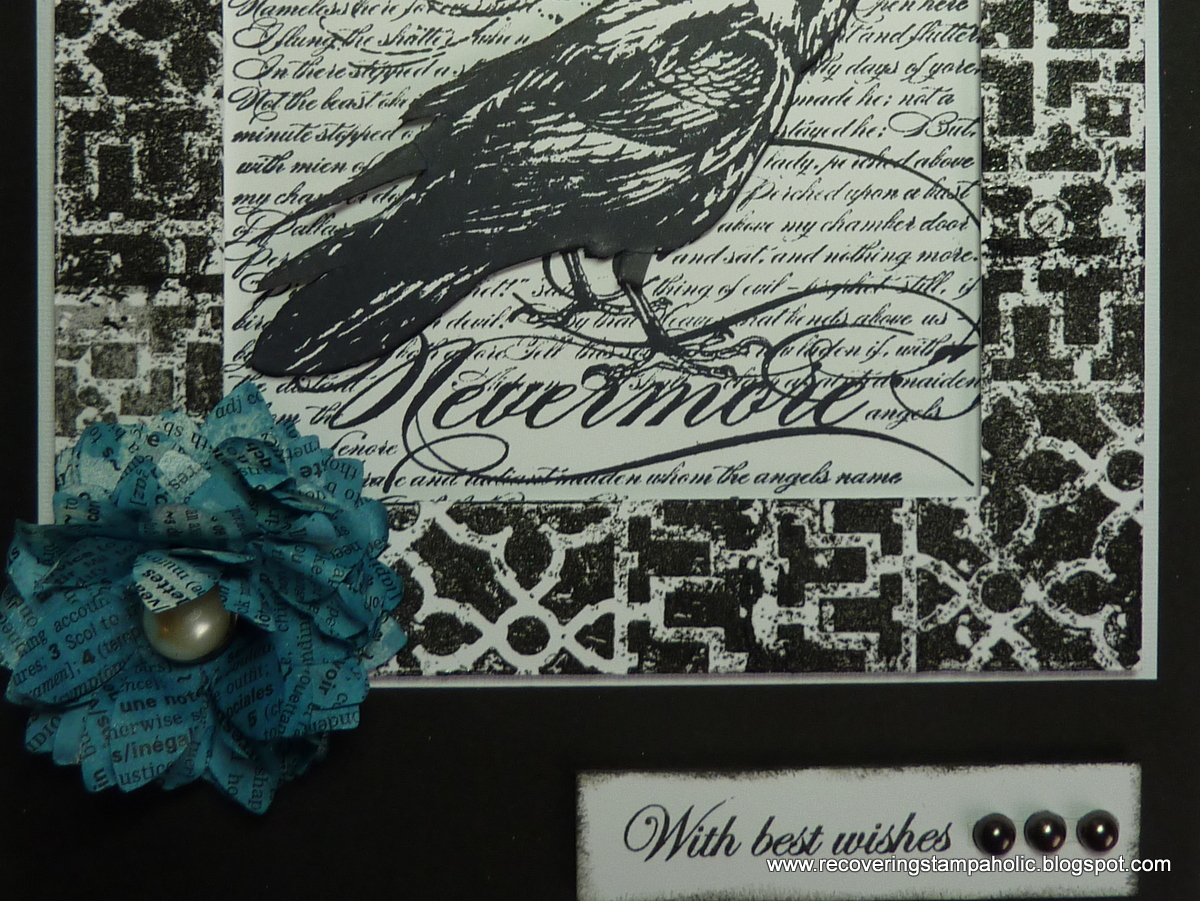
I have just got my hands on a few new stamps from the latest release from Stampendous. As soon as I saw this Raven on the script background (CRR152 Cling Raven Background), I knew I had to have it. And a perfect choice for this week's challenge at Woodware - "Black and White with a pop of Blue".
The frame was made using another new Stampendous stamp CRR145 Cling Decorative Grate. I cut out the frame from thick white card, stamped all round with the grate stamp in black pigment ink then embossed with clear powder. I just liked the Gothic feel it gave to my main image.
I 3-D'd the raven, added a bit of blue to his hat along with a black pearl. For a final pop of blue I made a flower from lots of large daisies punched from an old dictionary I picked up from a charity shop. Before assembling the flower I mixed some blue Pearlex powder in a little spritzer bottle with some water and sprayed all the flowers. Once dry it's a case of putting all the layers together with a small brad, a bit of scrunching and a big white pearl to finish.
To get more inspiration, check out the Woodware blog this week to see what the other girls have made
The frame was made using another new Stampendous stamp CRR145 Cling Decorative Grate. I cut out the frame from thick white card, stamped all round with the grate stamp in black pigment ink then embossed with clear powder. I just liked the Gothic feel it gave to my main image.
I 3-D'd the raven, added a bit of blue to his hat along with a black pearl. For a final pop of blue I made a flower from lots of large daisies punched from an old dictionary I picked up from a charity shop. Before assembling the flower I mixed some blue Pearlex powder in a little spritzer bottle with some water and sprayed all the flowers. Once dry it's a case of putting all the layers together with a small brad, a bit of scrunching and a big white pearl to finish.
To get more inspiration, check out the Woodware blog this week to see what the other girls have made
Wednesday, 1 August 2012
Woodware - Shrink Plastic
Normally I love shrink plastic. The brand that Woodware sell is what I used to stock in my shop and I use it myself. Somewhere in my garage is a box with some shrink plastic in it. But at the moment the garage is filled with boxes of my son Paul's belongings while he is away travelling to Canada. One look and I decided that I would have to abandon that idea!! But as luck would have it I found a whole sheet of black shrink in my craft room. Easy I thought...intaglio!! Have you ever had one of those evenings where every good idea you have ends in disaster!! Well it was one of those times and everything I tried ended up in the bin!!
So eventually I found a little scrap of white plastic, just enough to punch out a jumbo tag. I thought I better play safe and stamp it to make an embellishment to go on a card. Here it is.....
This is for a friend who loves music and birds and I went for nice vibrant summery colours. I used a Stampendous stamp "Music Score" and a Magenta stamp called "Shadow Branch" to stamp the background.
As the shrink plastic was white I very lightly sponged with soft orange tones before stamping the bird with black stazon. The branch was stamped with Stazon Gold metallic ink. I love this little mini bird, it is so sweet.
To keep the sort of natural theme I used garden string rather than ribbon to attatch my tag.
The lovely bird stamp is another Stampendous stamp. I have used this many times before and it is still a favourite. If you are looking for Stampendous stamps check out The Stamp Man. They stock a really big range and their prices are very good.
At the end of the day, not what I had planned but I was quite pleased with the result in the end.
Siobhan x
This is for a friend who loves music and birds and I went for nice vibrant summery colours. I used a Stampendous stamp "Music Score" and a Magenta stamp called "Shadow Branch" to stamp the background.
As the shrink plastic was white I very lightly sponged with soft orange tones before stamping the bird with black stazon. The branch was stamped with Stazon Gold metallic ink. I love this little mini bird, it is so sweet.
To keep the sort of natural theme I used garden string rather than ribbon to attatch my tag.
The lovely bird stamp is another Stampendous stamp. I have used this many times before and it is still a favourite. If you are looking for Stampendous stamps check out The Stamp Man. They stock a really big range and their prices are very good.
At the end of the day, not what I had planned but I was quite pleased with the result in the end.
Siobhan x
Friday, 27 July 2012
The Stamp Man - Anything Goes Celebrations
The latest challenge at The Stamp Man is entitled "Celebrations". I must admit I found this one quite difficult even though there are loads of occasions to celebrate. And then because I couldn't make up my mind I ended up last night having to make something quickly. I started with the Aspect of Design "Antique Script with Keys" stamp. By the time I had that layered up, I had the idea of making it into a more masculine 21st birthday card.
I used Squeezed Lemonade, Scattered Straw, Mustard Seed and Vintage Photo for my blended background. Then I built up some layers of stamping for depth.
I dug out some of my Tim Holtz Ideology "Numerals" to add and then embossed them with copper powder. T turned out really nice!!
The "Time to Celebrate was a free stamp ages ago from The Craft Stamper magazine.
As a finishing touch I added the key and Bob's your uncle or your 21 year old nephew!!
So if you would like to join us at The Stamp Man then come up with your take on a celebration and be in with a chance of winning a £10 voucher.
Our circle journal group are off for a picnic tomorrow weather permitting!! Better go and look out the wellies. Hope you have a good weekend whatever you are doing.
Siobhan x
I used Squeezed Lemonade, Scattered Straw, Mustard Seed and Vintage Photo for my blended background. Then I built up some layers of stamping for depth.
I dug out some of my Tim Holtz Ideology "Numerals" to add and then embossed them with copper powder. T turned out really nice!!
The "Time to Celebrate was a free stamp ages ago from The Craft Stamper magazine.
As a finishing touch I added the key and Bob's your uncle or your 21 year old nephew!!
So if you would like to join us at The Stamp Man then come up with your take on a celebration and be in with a chance of winning a £10 voucher.
Our circle journal group are off for a picnic tomorrow weather permitting!! Better go and look out the wellies. Hope you have a good weekend whatever you are doing.
Siobhan x
Thursday, 26 July 2012
Woodware DT - Zentangle
This week we have been asked to to some zentangle. Luckily I had bought a book on it at the last craft fair in Glasgow. And I took the stuff I needed on holiday with us so I could have a play. But we were blessed with good weather and the zentangle stuff never got taken out of the bag. So this week I had to have a quick go and come up with a sample to post today.
So I dug out my Dreamweaver outline stencils and found the two ginger jars. Once I got started I quite enjoyed it and can easily see how it can become addictive. So please be forgiving as this was my first attempt but I am sure I will get better with a bit of practise.
Once i finished layering up I used a script background paper and a Chinese coin to finish off.
The coin was finished off with a couple of cocktail sticks coloured with black ink and a bit of silver thread wrapped around the sticks.
There have been some brilliant samples of Zentangle on the Woodware blog this week. Be sure to check them out. I love the fact that you can stamp out or draw your outline, then all you need is a fine tipped black pen.
Hope you have a good weekend.
Siobhan x
So I dug out my Dreamweaver outline stencils and found the two ginger jars. Once I got started I quite enjoyed it and can easily see how it can become addictive. So please be forgiving as this was my first attempt but I am sure I will get better with a bit of practise.
Once i finished layering up I used a script background paper and a Chinese coin to finish off.
The coin was finished off with a couple of cocktail sticks coloured with black ink and a bit of silver thread wrapped around the sticks.
There have been some brilliant samples of Zentangle on the Woodware blog this week. Be sure to check them out. I love the fact that you can stamp out or draw your outline, then all you need is a fine tipped black pen.
Hope you have a good weekend.
Siobhan x
Subscribe to:
Posts (Atom)