Friday 29 March 2013

Woodware - Around the World


This week at Woodware we are going around the world. After seeing what the other girls have done this week, my effort seems a bit basic. I decided to use a new set of Stampendous travel stamps along with a lovely quote that I recently got. I have made a quick simple card which you could give to someone setting off travelling.


I have simply blended brown inks on a white square panel and distressed with some splatters of water. Then some background stamping with stamps from the Stampendous set SSC1166 Air Travel :


This set would be very useful for your travel scrapbook pages. I have also used this new Stampendous cling quote stamp. Anyone who knows me will know that I love including quotes in my projects. My son is still in Vancouver and I haven't seen him since last July. I am getting the chance to go to Vancouver in June to attend a conference for work. So I am hoping to see my wee boy!! All 6ft 2inches of him!! 


I embellished the card with some little stamped tags and some string. I really like the vintage feel of these images. If you look on the Woodware blog this week, Pam our DT buddy from across the pond has also used this set in a fabulous wallet for keeping all your travelling paraphernalia in one place. A great idea.
Let's hope it's a warmer weekend than last week!! Hope you have a good one.
Siobhan x

Saturday 23 March 2013

Woodware - Lavander and Lace

I am last to post this week for Woodware. Our theme this week is Lavender and Lace. I will be in Yorkshire this weekend with my friend Linda for our craft retreat. We have been several times now and it is always lovely to see the regulars. The retreat is run by Janet and Michelle of Lovin Ink. This time we are having a go at altered books. It's something I have never tried before. I love making little books but have yet to alter one!! If the results turn out OK I will post it on my blog when we get back. 
But back to this week's offering. I used two Stampendous stamps that I recently got ....the chandelier and a medallion stamp.


I stamped the medallion stamp with Versamark repeatedly to cover the white card stock then embossed with a pearl white embossing powder. This was my resist. I then blended blue and lilac pigment inks over the top. I love the little Colorbox Cat's Eye ink pads for this as you can really blend them well. A quick wipe over the top with kitchen towel makes the white pop. So this was my "Lacy" background.


 My main image is the gorgeous Stampendous Chandelier stamp which I embossed with a pearly purple powder.
To finish off a few pearls and some ribbon. And my flower was made from parchment vellum. I stamped it first with the medallion stamp and White Staz-on then punched out some flowers before building it up. All in all I thought it was quite "Downton Abbeyesque".


I have just seen the weather forecast and just hope that we managed to get to Skipton!!
Whatever you are doing this weekend I hope it's a good one.

Siobhan x

Monday 11 March 2013

Woodware - Spring Blooms

Firstly apologies for being late for this post. I had maybe a glass of wine too many last night and forgot to write my post for Woodware. Well it was Mother's Day ....!!
Anyway here it is. We were asked to use Spring Blooms as our theme. I know the Onion Bloom stamp from Magenta is not really a spring flower. But I used fresh greens and yellows to give it a touch of spring.


For the main image I used yellow and green brush markers directly on the stamp and spritzed lightly with water before stamping onto white card.


I love the effects you get using this brush less watercolour technique.
For the background  I used a resist known as Ghosting. I first came across it in the lovely book Magenta published a few years ago called "Paper Magic". You stamp your image using white pigment ink all over the card and allow to dry or heat set. Then blend 3 or 4 colours of pigment inks over the top. I used a couple of yellow and green Colorbox Cat's eyes. They are great for this technique. But alternatively you can use a bit of sponge. Rub firmly over the top with some kitchen towel and your images will appear. I used another Magenta stamp for this called "Shadow Branch" but any solid image would work quite well.

 
  I then over stamped tone on tone with a little sprig stamp just to add a little more depth. What I like about this technique is that it allows you to make lovely subtle delicate backgrounds that can be tailor made for your main image. How many times do you waste time looking for exactly the right patterned paper to compliment your main image? I know I have. This way you make your own!!
A bit of ribbon and a few pearls just add the finishing touches.
Have a good week everyone.
Siobhan x

Tuesday 5 March 2013

Woodware - Sketch Challenge 21


Well folks, this week is our 21st sketch challenge for Woodware. This is the one you are invited to enter as there is a voucher up for grabs. 
Here is the sketch :


A nice simple layout. I have turned the sketch 90 degrees for my project. I chose to use the lovelyCRP146 Rose Corset made by Stampendous. I always find this goes down a treat for girly cards. 
 

I coloured the image with pink and coral coloured pencils. To add a bit of bling, I embossed the edges of the scallop oval with Frantage Shabby Pink embossing powder.


I stamped a border down the RHS using the border from Stampendous Damask Chair clear set. The American Lady Corsets script came from another Stampendous clear set. I also used one of the Crafty Edge punches to add a lacy edge on the strip of patterned paper to continue the feminine feel.
For my rose embellishment I used my "Emboss Gloss" wand on the edges of the petals before assembling the flower, to emboss with the Shabby pink powder. I love the texture of these powders....they really do add another dimension!!
Here is my rose in more detail:

 
Remember if you want to join us in this month's challenge, you will find the details on the Woodware blog. Stampendous have also just released their new catalogue and there are some stunning stamps and new Frantage powders.
Have a good week.
Siobhan x

Saturday 2 March 2013

Tagtastic Circle Group

Last year I was part of a circle journal group. We decided this year to have a different theme and we decided on Technique Tags. For anyone that follows Tim Holtz, you will know that he uses tags for so much of his art work. They are a nice size and shape and easy to display or store.
The idea is that each month we chose a technique in advance. We make one tag using the basic technique as a reference. Then we make two tags using that technique then finishing with stamping and embellishments. One tag we keep for ourselves and the second goes to a member of our group. Its a great way to keep in touch as we meet for coffee and blether for an hour or so and today we swapped our first tags. So I told the girls that I would post the tags on my blog. I apologise in advance for the quality of the photos. The lighting was not great for taking pictures but hopefully you get the idea.
Our first technique was "BLENDED DISTRESS/SPRITZ AND FLICK". We thought we would start with something simple to ease everyone in.

First up was Erin's tag which went to Isobel. This was Erin's first attempted at this technique. I love the combination of colours.


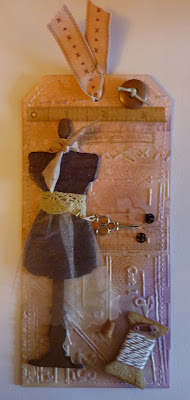
Next was Isobel's tag. This went to Lin. I like the soft vintage colours and all the little haberdashery details.


Lin's tag went to Linda. I love the colours Lin used and the metallic pocket watch which started life as mirri card!

 
Next up Linda's Tag was for Liz. Unfortunately Liz couldn't make it today so I have her tag for safe keeping. So Liz if you see this you will know what you are getting!! The wings and flowers are all sparkly and I love the citrus colours Linda has used!! 


This was Linda's second tag, but she didn't know if Liz would like the Octopede factory image so went for a safer option to give away, but I love this one two - fun and quirky just like our Linda!!


Next up is Maggie's tag which went to Pat. Maggie was inspired by the Chinese New Year for her tag. I think she has captured the oriental theme beautifully! Can you spot a serpent's head?


Pat's tag came to me. Apologies Pat, my hand must of shook a bit when I took this photo. Pat is a new member to our group but I think she did a great job. I love the colours and the little scene is actually tissue paper. Very clever!


My tag went to Sue. I chose a nature scene for my tag. I got given the poppy die from my sister last time I was home in Ireland and thought it would work well in my country scene.


Sue ended up having to make a tag for her daughter Erin. So to surprise her she made two, one Erin had seen and the other she hadn't. This is the one Erin knew she was getting. I love the colours and the use of Frantage powders around the edge.

 
Now here is the tag that Erin didn't know about. Erin loves Winnie the Pooh so a perfect choice from her Mum!!


Last up is an extra tag I made. Lynne was unable to make the meeting so that meant Maggie would have had nothing to take home. So she got my extra tag of the elephants.


Everyone seemed to enjoy the challenge. It was lovely to see so many great interpretations of the technique. I think you will agree, we have a talented bunch of ladies. Next time we are tackling Embossed Resist Backgrounds.
Related Posts Plugin for WordPress, Blogger...