Every DT member was asked to randomly pick a name from the people who left a comment on our post. So I wrote out all the names, put them in a hat and got my hubby to pick one out. I tried to use that random org thingy but it was a bit beyond me!!
And the winner is
GEORGINA
I have tried to e-mail you Georgina. In case you didn't get it can you please e-mail Dorothy at Woodware Dorothy@woodware.co.uk to claim your prize and leave your name and address.
Well Done!!
Woodware are going to be giving stuff away every month so remember to check out the Woodware blog regularly for great ideas and blog candy.
Hope you are all safe and warm on this very windy night
Siobhan

Monday, 12 September 2011


Woodware Design Team - Sugar and Spice
Hi Everyone
This week at Woodware we are onto "Sugar and Spice". Help.......!!! I don't have much little girly type stuff apart from my Tilda stamps. I need another lifetime to get through all of those!!! So I had a rake and found this delightful Magenta stamp which I have used for baby cards.
I then computer generated the words and hey presto ... I had the bare bones to get started. Sugar and Spice - well that had to be pink and brown but cinamon brown rather than chocolate brown. The fan flowes were made with a die I have but you can do them by hand using any border scallop punch and scoring between each scallop. I used to do them that way until I got a die.
The punched border is a cassette for the Woodware crafty edger and my favourite at the moment. Have I said before how easy these are to use!! Remember to check up on the rest of the DT at the Woodware blog.
 | ||||||||||||||||||||
| Sugar and Spice |
Friday, 9 September 2011
Hanging About
This months challenge at Crafty Individuals is "Hanging About". The challenge was chosen by Lucy Edmondson and her brief was ‘this would give people scope to do a wall hanging, canvas, frame, lantern, bird cage, bird house, jewellery, dangly things on cards, pennants – all sorts. Or they could interpret it as friends hanging about together.’ It is nice to do things other than cards so I decided to do a little triptych bird hanging using Autumn colours. While deciding what size to make each panel, I came across a pile of beer mats my friend Liz had given me. I liked the shape of them rather than being square and thought they would be ideal.
Here's how I got on:
 All the stamps used are Crafty Individuals. I love the owl so had to include him of course!!
If you like buttons, check out Textile Garden. That's where I found the lovely metallic leaf button. I just rubbed over some coffee archival ink to darken.
The next panel includes a piece of stampboard:
I coloured the stampboard domino with Distress inks, then stamped in Coffee archival. I then triple embossed it to give a lovely enamelled look. The chipboard bird was done the same way but with some gold glimmer mist sprayed on before embossing to give it a bit of shimmer. I stamped the foliage stamp in gold and embossed with a detail gold powder.
For the final panel I used my favourite little wren stamp and made a feature of it on the die-cut frame.

I stamped trees along the bottom. Then to finish off I die-cut some leaves from shrink plastic. I coloured them with Brilliance inks before shrinking.
There are lots of inspiring samples on the Crafty Individuals blog.
Hope you all have a good weekend!
Siobhan
 | ||
| The back to show the beer mats I used!! |

 | ||
| Top panel |
The next panel includes a piece of stampboard:
 | ||
| Centre Panel |
For the final panel I used my favourite little wren stamp and made a feature of it on the die-cut frame.

I stamped trees along the bottom. Then to finish off I die-cut some leaves from shrink plastic. I coloured them with Brilliance inks before shrinking.
There are lots of inspiring samples on the Crafty Individuals blog.
Hope you all have a good weekend!
Siobhan
Tuesday, 6 September 2011
Ethel - Where has all the Money Gone!!
It's time for this week's sample for Creative Expressions. I have used Ethel with her curlers in for this card from the "Wrinkles Don't Hurt" set. The sentiment is very apt I am sure for most of us, especially if we have recently got a bit carried away in a craft shop!!
I have used oval nesties for the matting. The lovely lace-like border is from one of the recent Spellbinder sets Parisian Accents. It is a really useful set.

I hand stitched the border and cross stitches with brown linen thread. The button came from a recent purchase of lovely buttons from Textile Garden. If you are looking for some nice buttons then check out this site!!
The flower is from another recent Spellbinder set called Carnation Creations . I gave them a bit of shape by using a large ball embossing tool on a embossing mat and put them together with a brad.

I quite like the peachy tones. It reminds me of some Laura Ashley style prints my Grandmother had in her house.
On a completely different note, my daughter Catriona was home at the weekend and I found a few doggy pictures on my camera. She always seems to get better shot than I do!!
Here's Alfie lounging on his chair. He is definitely not a dainty miniature Schnauzer!!

He normally looks more like this:

Hope you are all having a good week!
Siobhan
Woodware Design Team - Sketch Challenge
This week is another sketch challenge over at Woodware. Here is the sketch :
 Nice and simple. I thought I would do a couple of Christmas samples this time. I have just received a couple of new Woodware Christmas stamp sets. The Christmas tree comes from a new Francoise set FRCL 204 Teardrop Christmas. I used to do special workshops that included a set of stamps and I often used Woodware sets. They were always good value for money and this set would have been perfect.
I am sure I will be using this set again for future challenges. I used a traditional colour scheme for this very easy card. I don't know about you but I tend to do more simple ideas for Christmas.
 The tree was embossed using a Stampendous embossing powder called Nutmeg. I also dry brushed a little gesso onto the dotty paper to make it look a little more interesting. Some simple layering and a sentiment to complete.
The sentiment comes from another new Woodware set designed by Jane Gill JGCL 551. I embellished it with gold nail heads.
The next sample is the sketch used the other way up.
This time I used a Stampendous set SSC1013 Winter Trees
to create my little winter scene. This is a lovely little set which I have used quite a bit in the past. This time I have gone for blues and greys.
The border for the centre strip was made using the Woodware Crafty edger starter set (with the ribbon slot border)
Check out the other girls work this week at the Woodware blog.
 |
| FRCL 204 Teardrop Christmas |

The sentiment comes from another new Woodware set designed by Jane Gill JGCL 551. I embellished it with gold nail heads.
The next sample is the sketch used the other way up.
This time I used a Stampendous set SSC1013 Winter Trees
to create my little winter scene. This is a lovely little set which I have used quite a bit in the past. This time I have gone for blues and greys.
The border for the centre strip was made using the Woodware Crafty edger starter set (with the ribbon slot border)
 |
| A Winter's Day |
Saturday, 3 September 2011
Circle Journal - It's Almost Time
This post is really for getting our circle journal ladies to contact me so we can arrange our first meeting.
If you are on this list can you please e-mail me at siobhanfyffe@gmail.com so that we can organize our first get together:
- Lin Connolly
- Liz Urquhart
- Isobel Hynd
- Lin MacInnes
- Linda Turner
- Maggie Higham
- Sue and Erin Veitch
- Elizabeth Mitchell
- and any one else who I may have inadvertently forgotten.
The first meeting will be just a chance to find out what's involved and to select your themes. I thought for the first meeting we could meet at my house. Liz Young is now a Stampin Up demonstrator so we could combine it with a chance to see some nice stamps etc. I will make some soup and sandwiches.
Those of us who have already done a circle journal will bring these along to show the others.
Here are the pages I did for Irene Ruddy's journal.


The theme for these pages was "My Favourite Stamps". So your theme can be very open or you can be more specific. This time I have chosen "Natural History" as my theme.
So ladies get thinking and I look forward to getting started.
Wednesday, 31 August 2011
Woodware Design Team - Dreamweaver Week
Welcome to Woodware's first blog hop! And we have a giveaway too! We are really happy to be joining with the Dream It Up Team to bring you innotive ways to use our wonderful Dreamweaver stencils and supplies all week long. By the end of the week, you'll have seen stencils used in inspirational ways you just couldn't have imagined, and you'll see that, although our stencils are wonderful for papercrafting, they have SO MANY other uses too!! We will have several posts a day for you, from Monday 29th August to Saturday September 3rd. At the end of our celebration, each designer will randomly select a winner from all blog comments to receive a free Dreamweaver stencil. We look forward to you partying along with us!
 |
| Flying Geese |
- I sponged colour onto the canvas using pigment inks. I gave the canvas a light covering with yellows and soft orange.
- I used a piece of scrap paper to create a mask for the mountains. I sponged slightly darker tones along the mask and towards the bottom of the canvas to create my mountain range (I live in Scotland - I am obsessed with mountains!!!)
- I punched a largish circle out of scrap paper and sponged oranges and reds through the mask to make my setting sun.
- I then placed the stencil of the geese (LG687 - Flying Geese) onto the canvas and pasted with white Dreamweaver embossing paste. Repeat with the bulrushes (LL517 - Cattails).
- When completely dry I put the stencils back on to apply the colouring to the geese and bulrushes. I tend to use stencil brushes and pigment ink. I find them easier to use and as a stamper I have lots of colours.
- I then stamped the sentiment onto a piece of card and die-cut the frame plate to finish off.
 | |
| The geese in more detail |
The edges of the canvas were bevelled, so I used a little border stencil (LM282 - Leaf Border) on each side for a little extra interest.
LM282 - Leaf Border

Here is a card I made in a previous post. For this I stencil embossed the geese with my light box onto the background paper and coloured with pigment inks. I then stamped the trees along the bottom.
 |
| Home to roost I have a little story to share about the geese. My father lives near the coast in South East Ireland. In the autumn there are often flocks of geese flying in to rest over night in the fields. My mum always loved to see them especially when the sun was going down and the sky would be all orange, pinks and reds. After she died of cancer a few years ago I made a card for my Dad with the geese stencil. I told him it represented him in the front with me and my sister close behind as we carried on our own life journeys without my mum. He is not normally sentimental, but at our first Christmas without her my father surprised us both. He had a local silver smith to make us each a pendant featuring the three geese. Needless to say there were lots of tears but we both have something to cherish that means so much. Here is a picture of the pendant.  Here is the card that I made - it was in the earlier days of me and stencils so it's a bit basic. My Dad however loved it and it sits in a frame in his hall.  |
Thanks for visiting.
You can find all the supplies you need right here . Your next stop along the hop is to Wendy at Paper Therapy
Enjoy the trip!!
Siobhan
Monday, 29 August 2011
Creative Expressions - Christmas
I think I mentioned on a previous blog that I am trying to batch some Christmas cards to take over to Ireland next month. I always try to make some for my Dad to send out. So I have just done a few of this one.
 | |
| Winter Wonderland |
Dreamweaver Blog Hop
This is an exciting week for our Woodware DT. We are joining in a blog hop with the very talented ladies from the American Dreamweaver DT. As Woodware are the UK distributors of Dreamweaver in the UK we were all very willing to join in and showcase some of the fantastic designs available.
My post is on Wednesday but if you want to join in now then go to Caz's blog for the first post and she has linked to the next member in the hop. I have already been hopping this morning and I can honestly say I think it will be a good week.
Remember to leave a comment as you could win a Dreamweaver Stencil at the end of the week.
Here's an old sample I did using the beautiful Oriental Dragon stencil using metallic paste and foil. Nothing to do with this hop but just another sample of a Dreamweaver stencil!!
Saturday, 27 August 2011
The Stamp Man Challenge #30 - Travel
I love having a go at The Stamp Man Challenge as it's usually a chance to get a bit dirty and grungy. I decided to have a go at a box for a change.
I coloured the box with a combination of Distress Stains and Inks. The stamping was done using Rangers Archival Coffee ink. This is definitely one ink pad I could not manage without. The background stamp came from the Stampers Anonymous set" Papillon". The car and quote are both from Stampers Anonymous "Road Trip". I added some flourishes with gold ink and embossed with gold powder.
 |
| Travel Box |
I used gold ink and antique gold embossing to add some texture to the PARIS plate and to the keyhole on the side of the box.
 |
| Detail on the lid of the box |

I think I might give this to my son for all the foreign coins he has lying around his room!!
Hope you are all having a good weekend.
Siobhan
Wednesday, 24 August 2011
A Wish for Peace - Penny Black
This month's challenge at Penny Black at Allsorts is "free and easy". I am going to Ireland next month to see my Dad and sister. Since my mum died I started making cards for my Dad to send out at Christmas. Now he likes them every year. So I am trying to make a batch every week so I have his supply ready to take over to him!!
This is a stamp I bought last year from Penny Black called "A Wish for Peace".
 |
| A Wish for Peace |
I used Tom Bow brush markers directly on the stamp and spritzed lightly with water. It is such a delicate scene so I kept the background quite muted and soft.
I know it's only August, but this year I am going to be organized...........!!! I bet you have all heard that before.
Siobhan
Woodware Design Team - Funny Folds
I am not really into all the wierd and wonderful ways of folding, so it took me a while to decide what to do. Once in a workshop for Stampaholics we made a tri-shutter card on a Scottish masculine theme. It was quite fun to do so I decided to use that idea for this week's challenge.
I have used the lovely CRP119 Dragonfly vine stamp from Stampendous as my centre piece. For the rest I used one of the Magenta puzzle sets CSET 001. These sets are ideal for this type of card as they are all framed, so easy to cut out.
 | |
| Tri-Shutter Card |
If you have not tried this then here are the scoring and cutting lines. I have also included measurements for the matting layers. You can just use the larger sizes if you want a single layer, but the inner matting sizes are there should you want them.


I wonder what the rest of the team came up with. If you want to see then hop along to The Woodware Blog.
Here is the Scottish version I mentioned earlier.
Enjoy your day!! Here is the Scottish version I mentioned earlier.
 | |||||||
| Proud to be Scottish |
Siobhan
Monday, 22 August 2011
Ethel and Murray - Out for a Drive
This week I decided to use Ethel and Murray in their car for this week's card for the Creative Expressions DT challenge. This image is from the set "Wrinkles Don't Hurt" as is the quote. I thought I would have a go at a side- step card. I found the instructions on-line. Just google "Side-Step Card" and plenty of sites pop up. All the trees came from another set - "Create-a-Scene - Trees." These are ideal for this type of thing.
 | |
| "Out for a Drive" |
Coming soon on the Creative Expressions website will be links to all 6 DT members. So you will be able to check out all the different samples from a talented and varied bunch of stamper's.
Saturday, 20 August 2011
Dreamweaver Stencils - Wisteria
Tomorow the girls (Lin Rosie and Carey (and Alan) are coming over. They were all part of the Stampaholics team and I have been meaning to organise a wee get- together for ages. So I am looking forward to seeing them all and having a good old natter!!
So not much crafting this weekend - I have had to clean the house and cook!! I must sound like a right mink!! But I am sure you all know what I mean. I dread when my mother in law comes as she is so house proud!
Anyway here is another sample of a Dreamweaver stencil. Some of my old customers might remember this one.
 | |
| Dreamweaver Wisteria stencil |
For this piece I used matt black embossing paste. When the paste was completely dry, I put the stencil back on and applied versamark onto the dried paste with a sponge. I took off the stencil and I then used mica powders with a brush to add the colour. A big soft brush was used to brush any excess off the background card. I then spritzed lightly with water to set the powders. Unfortunately you can't see the lovely shimmer that you get with the powders but it really is very pretty.
Hope you like. Thanks for dropping in to have a look.
Siobhan
Friday, 19 August 2011
Woodware Design Team - Take Two Colours
Our theme this week was to take two colours and design a card. Well that's easy for me. My favourite colour combo is pale aqua and brown.
I wanted to use the lovely Stampendous Bird Frame stamp (CRP 126). As you probably all know by now I love anything with birds on. To give me more room to work with I used half a sheet of 12 x 12 Bazzill, folded so that the fold is at the top (tent card). I stamped the birds onto some aqua scrapbook paper with coffee ink and added some faux stitching around the edges. | |
| New home |
I also used the Woodware Crafty edger. The cassette I used is the one that came with the starter set. I thought it resembled a fence (upside down, I know!!)
To finish off I made a shabby chic style flower and finished with the lovely delicate maidenhair fern punch. The instructions for this flower are in a previous post
 .
.
As I couldn't find my new home stamps I used computer generated words for the sentiment tag.
Very simple, but often less is more!!
Hope you like it. To see what the other girls have picked for their colours please visit the Woodware Blog
SiobhanWednesday, 17 August 2011
Ethel relaxing at the Beach
This is my first card for the Creative Expressions DT. We were sent a set of stamps "Wrinkles Don't Hurt". This range features two characters Ethel and Murry. This is Ethel!! There are loads of fun sentiments to go with the images. Check out the Creative Expressions website to see the full range.
 | ||
| Ethel on the Beach |

The lobster and starfish are also Spellbinder shapeability dies. And I found the seagull button in my embellishment box.
Dreamweaver Stencils - Ginger Jar
Coming up in a couple of weeks, our Woodware DT is joing the Dreamweaver USA DT for a blog hop. I have made a piece for that which will be posted that week. But while I was looking through my box of Dreamweaver Stencils I remember fondly using many designs over the years in workshops at Stampaholics. Woodware are the UK distributor of Dreamweaver in the UK. So I thought it might be nice to share a few projects with you, just to remind you how versatile brass stencils can be!!
First up is the beautiful outline stencil of the Ginger Jar. You can use so many different techniques to decorate it. Here's a card I did recently as a commision for a Wedding Anniverary.
 | |
| The Ginger Jar |
I am going to enter this into the current Dreamweaver challenge. If you like stencils you will love the work of the American girls. Check it out at the Dreamweaver blog
Siobhan
Tuesday, 16 August 2011
Bright and Beautiful
This month's challenge over at Crafty Individuals has been set by been set by the amazingly talented Helen Chilton . The words "Bright and Beautiful" always remind me of primary school. It was the hymn we sang nearly every week at assembly. So the inspiration for this piece came from the words "all creatures great and small".
Swallows are one of my favourite birds and I love the Crafty Individuals stamp with the silhouette of the swallows on the telegraph wire.

The foliage is all from a CI Elements set, and the words is an old Penny Black quote which I love.
At the hospital where I work we have swallows nesting just outside our back door in the loading bay. My colleague Pam and I are now watching them rear their second lot of chicks.

Saturday, 13 August 2011
Woodware Design Team - Look what I did with these folders!!
Yes this was definately a hard one this week. I had great ideas but most of them ended up in the bin. So in the end I went for very simple. The Woodware sheet comes with several different sizes of mini file folders. Great for gift tags to suit all sizes of gifts.

A nice idea for a gift would be to make a selection of these for various occasions and put them in a nicely decorated box. I like to use coloured tissue paper for gift wrapping and often don't have time to make a gift tag from scratch.
The larger ones are perfect little holders for the credit card style gift cards that are widely available. To make this seem more a gift in itself why not make this cute little folder to pop the gift card in.

This little folder is quick to make:
- Cut a strip of card 8.5 x 25cm
- Score at 10.5, 11.5 and 22cm
- Fold on the score lines.
- At the short flap end round the corners with a punch.
- Mark 2 holes in the middle of the flap about 1cm apart.
- Punch holes with a punch. Close up the booklet so that you can draw through the holes onto the card below. Punch these holes out.
- Cut a piece of nice paper 8 x 7 cm and attach to LHS of front panel.
- Decorate as desired. Thread ribbon through holes on front panel.
- Colour and decorate largest size file folder from the sheet.
- Attach to inside of folder. Insert gift card. Thread ribbon through holes in flap and tie in a bow.
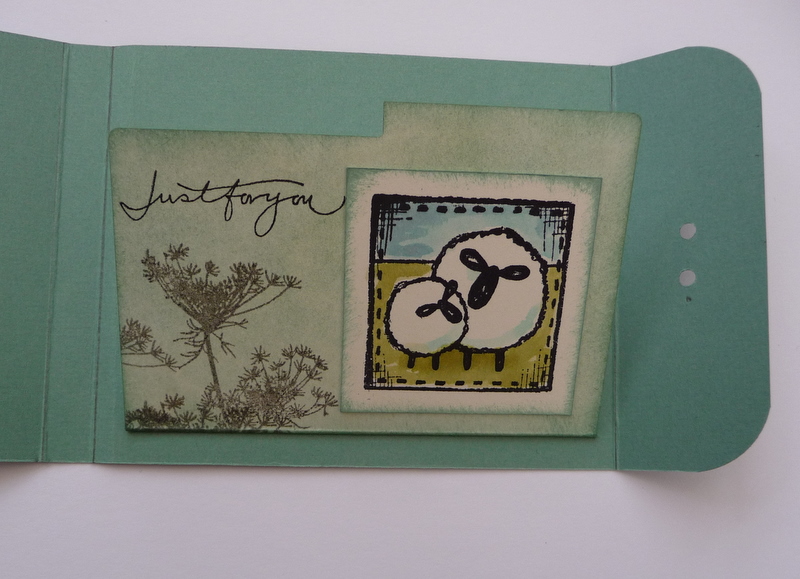
I really am looking forward to see what the rest of the team have done this week!!! Why not check out the Woodware Blog for yourself.
Thursday, 4 August 2011
The Stamp Man Challenge - Show us Some Stitching
The new challenge at The Stamp Man this fortnight is "Show us Some Stitching". One of these days I will get my sewing machine set up so I can actually use it!!
So it's either hand stitching or faux stitching I do at the moment.
I bought the Tim Holtz Alterations Sewing Room die from the Stamp Man when I was in Skipton a few months ago. Therefore the perfect choice to go with the stitching theme. And I went all pink and girly for a change - what is happening to me, I ask myself!!
 | |||||||||||||||||||||||||||||||||||||||||||||||
| A Stitch in Time |
I stitched the zig-zag borders down both edges with very fine shimmery metallic thread. At the top I added little clusters of beads. I know you can't see it but I also stitched along the top of the lace so that it could be gathered to form the skirt around the mannequin.
I think I know someone who would like this!! My daughter Catriona was home for a couple of days. When I went to import this picture from my camera I found a couple of photos she had taken of our dog Rory. He looks so cute, I thought I would share it with you!
 |
| Rory asleep in the garden!! |
Subscribe to:
Posts (Atom)
